Setting up a WIFI link between DL8RDS and DB0MHB
This project is the supertarget of other projects:
- Turn a Fonera router into a link station. My Fonera router will be the link transceiver station on both sides, in each case residing very close to the antenna to reduce the loss of signal strength in long coax cables.
- Upgrade an ASUS WL-500gP to control my RIG. I am running two ASUS routers: One to control my DL8RDS rig and the other to control the DB0MHB rig.
- WLAN and Amateur Radio - Here is some technical background...
- aerial.net - They have WIFI gear within the 13cm amateur radio band
And it is a sister project of:
Progress report
- 2008-09-28 No good. Today it was a sunny autumn day and my friend Bernd DJ6PA was ready to help me over at DB0MHB. At my station, I placed my small tube-enclosed 13cm YAGI into a basket of clothes, directing it right towards DB0MHB, as I have clear sight to DB0MHB. Then I took the car and drove over to get the other side right. But what a disappointment. It was not possible to establish a link. Maybe it was up to the polarization, which I didn't consider at all right away (as a shortwave guy you don't have enough space anyway to care for polarization, but for SHF it seems really important). Maybe it was up to the fact that the tube-enclosed WIFI YAGI was really not worth the money. Bernd already tested it and it didn't really work well. Anyway, let's give it another try. BTW, we had a number of other problems too, mostly due to the reason that these damn WIFI engineers always use Reverse Polarity SMA instead of normal SMA. Another reason for the initial failure could have been the rather long coax cables on both sides, on my (DL8RDS) side about 5 meters, and on the DB0MHB side about 10 meters.
- 2008-12-26 I have now purchased another YAGI over Ebay which was allegedly being used in another WIFI link scenario. This antenna should work better than the tube enclosed predecessor. I have also shortened the cables and I have constructed two Fonera routers to care for the link. Just a few meters of cables, even if H155 high quality ones, still eat up so much signal power that the WIFI transmitter won't deliver enough energy to the antenna and that the received signal strength won't make it into the receiver. So I decided to place the TRX very close to the antenna, only about 50 cm apart from each other. Today, I'm still waiting for a crimp compressor to fix the N plug, but that is a minor issue. I have also purchased a Linksys Power over Ethernet kit that provides the 5V which is required by the Fonera devices. The POE kit will help in case cabling should be difficult for any reason. Then everything should be in place for the next try.
- Decided to build highly efficient DC converters into the link transceivers and to ensure that every device runs with 12V. The plan to use the builtin 5V was discarded because there are too many risks: Mix up the wiring in a bad moment and all the nice electronics goes smoky.
- 2009-03-28 Success!! Today we managed to establish the link. The link distance is about 5 kilometers and the link quality is stable. The bandwidth we reached is a stable 36 MBit/s.
ath0     IEEE 802.11g  ESSID:"scramblescramble"  Nickname:""
         Mode:Managed  Frequency:2.412 GHz  Access Point: sc:ra:mb:le:sc:ra
         Bit Rate:36 Mb/s   Tx-Power:18 dBm   Sensitivity=1/1
         Retry:off   RTS thr:off   Fragment thr:off
         Encryption key:off
         Power Management:off
         Link Quality=17/70  Signal level=-79 dBm  Noise level=-96 dBm
         Rx invalid nwid:89896  Rx invalid crypt:0  Rx invalid frag:0
         Tx excessive retries:0  Invalid misc:0   Missed beacon:0
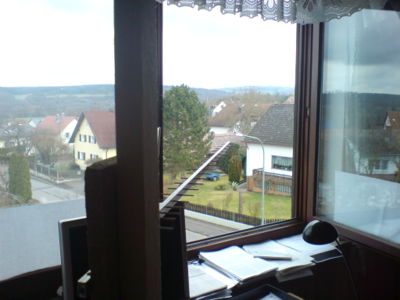
On my side, the antenna was even behind a window within the house. The window's glass is sure to have caused some further loss, but it had just a minor effect on the link quality. The 36 MBit/s is a great success and was very inspiring all over the evening. The next thing is to get the routing right. But since the proof of concept has been reached, I consider this project as finished.
In order to estimate the used transmitting power, here's a calculation example:
X dBm = 10*log( Y mW / 1mW);
so 0 dBm = 1mW
10 dBm = 10mW
13 dBm = 20mW
18 dBm = 63mW
19 dBm = 80mW
20 dBm = 100mW
An increase of 3 dBm doubles the transmitted power.
Here's a picture of the 13cm WIFI Yagi antenna on my side. In the background you can see the "Münchshofener Berg" (Münchshofen Mountain), 530m above NN. The counterpart of the link, DB0MHB, is located about 30 meters below the peak.
