ASUS WL-500GP: Unterschied zwischen den Versionen
Dl8rds (Diskussion | Beiträge) (→Compiling OpenWRT images) |
Dl8rds (Diskussion | Beiträge) |
||
| (9 dazwischenliegende Versionen desselben Benutzers werden nicht angezeigt) | |||
| Zeile 27: | Zeile 27: | ||
=== Compiling OpenWRT images === | === Compiling OpenWRT images === | ||
| − | + | Have a look here: [[OpenWRT]]. I have documented a lot of stuff on the generation of an image there. | |
| − | |||
| − | |||
| − | |||
| − | |||
| − | |||
| − | |||
| − | |||
| − | |||
| − | |||
| − | |||
| − | |||
| − | |||
| − | |||
If you also have such a 500gP (with Broadcom WIFI), you can use my configuration file instead of defining your configuration yourself (by make menuconfig). Here it is... copy it into the openwrt/trunk directory and rename it into ".config". | If you also have such a 500gP (with Broadcom WIFI), you can use my configuration file instead of defining your configuration yourself (by make menuconfig). Here it is... copy it into the openwrt/trunk directory and rename it into ".config". | ||
* [[Media:OpenWRT_ASUS-WL500gP_trunk_config.dat]] | * [[Media:OpenWRT_ASUS-WL500gP_trunk_config.dat]] | ||
| + | |||
| + | === Hacking the Hardware === | ||
| + | Here are some nice ideas: | ||
| + | * http://wl500g.info/showthread.php?t=11992 | ||
| + | * http://wl500g.info/showthread.php?t=14170 | ||
| + | |||
| + | Obviously the VIA USB controller has two more USB connections. It is really worth while to make use of these... I purchased an extra USB flash stick to contain my programs and to provide easier updates. | ||
| + | |||
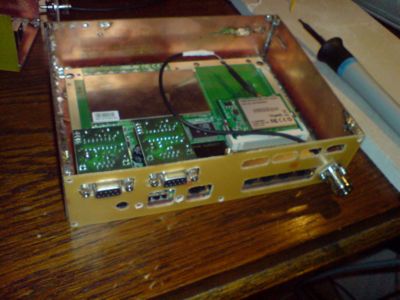
| + | === Building a new case === | ||
| + | I have built a new case with epoxy-boards (PCBs). | ||
| + | |||
| + | [[Image:ASUS-case.jpg|400px]] | ||
| + | |||
| + | === (x) net on OpenWRT === | ||
| + | Go there: | ||
| + | |||
| + | * http://www.swiss-artg.ch/xnet/beta/zip/wrtxnet.zip | ||
| + | |||
| + | and even better: | ||
| + | |||
| + | * http://db0fhn.efi.fh-nuernberg.de/doku.php?id=projects:openwrt:soft:ax25 | ||
| + | * http://db0fhn.efi.fh-nuernberg.de/doku.php?id=projects:openwrt:soft#hamradio_kernel_module_kmod-ax25-dg8ngn_for_openwrt-kamikaze_7.09_kernel_2.6_broadcom_mipsel | ||
| + | |||
| + | === Using the ASUS WL-500gP as a RIG controller === | ||
| + | Since these are subprojects, I have st up separate pages: | ||
| + | |||
| + | * [[Using the ASUS WL-500gP as a APRS digi]] | ||
Aktuelle Version vom 24. April 2009, 23:25 Uhr
Very recently I purchased this ASUS router. Compared to my Cisco Linksys WRTSL54GS it has the advantage of two USB 2.0 sockets. And I fear that my soldering pins onto the Linksys board broke some serial connections. At least I must state that the serial connection is quite unreliable meanwhile. So, next try.
I will dedicate this device to my friends from DB0MHB and give them digital access to their systems over the internet.
Inhaltsverzeichnis
1 Resources
- About Kamikaze, the ASUS and configuration issues
- http://wiki.openwrt.org/OpenWrtDocs/Hardware/Asus/WL500GP
- http://wiki.leipzig.freifunk.net/Asus_WL-500GP
- http://wiki.funkfeuer.at/index.php/Asus_WL-500Gp
- http://wiki.openwrt.org/OpenWrtDocs/KamikazeConfiguration
- http://wiki.leipzig.freifunk.net/Kamikaze
- http://downloads.openwrt.org/docs/buildroot-documentation.html
- https://dev.openwrt.org/
- WLAN and Amateur Radio, general information
2 Basic installation procedure
Installing OpenWRT on it is really easy. Take a pen and hold down the restore button. Then unplug and reconnect power. Keep reset pressed until the power diode starts blinking. This is the time to start the flashing process:
tftp 192.168.1.1
> binary
> trace
> put openwrt-brcm47xx-2.6-squashfs.trx
In my example, the image must reside in your current working directory. Then wait six minutes. Then powercycle the router. telnet to 192.168.1.1 and you're in. There's no passwd.
Then you can hack the little box to your needs.
3 Compiling OpenWRT images
Have a look here: OpenWRT. I have documented a lot of stuff on the generation of an image there.
If you also have such a 500gP (with Broadcom WIFI), you can use my configuration file instead of defining your configuration yourself (by make menuconfig). Here it is... copy it into the openwrt/trunk directory and rename it into ".config".
4 Hacking the Hardware
Here are some nice ideas:
Obviously the VIA USB controller has two more USB connections. It is really worth while to make use of these... I purchased an extra USB flash stick to contain my programs and to provide easier updates.
5 Building a new case
I have built a new case with epoxy-boards (PCBs).
6 (x) net on OpenWRT
Go there:
and even better:
- http://db0fhn.efi.fh-nuernberg.de/doku.php?id=projects:openwrt:soft:ax25
- http://db0fhn.efi.fh-nuernberg.de/doku.php?id=projects:openwrt:soft#hamradio_kernel_module_kmod-ax25-dg8ngn_for_openwrt-kamikaze_7.09_kernel_2.6_broadcom_mipsel
7 Using the ASUS WL-500gP as a RIG controller
Since these are subprojects, I have st up separate pages:
