NTP-Server with Raspberry Pi and Trimble Resolution SMT
Inhaltsverzeichnis
1 Scope
Basically this project is the same as the predecessor: NTP-Server with Raspberry Pi and Sure Electronics GPS Eval board
However I am using another timing receiver board here. It's one that I also purchased a long time ago but it would be shame throwing it away. Particularly given that I still have a large stockpile of Raspberry Pi boards.
2 References
2.1 Links
- http://www.satsignal.eu/ntp/Sure-GPS.htm Here the board is described very well
- http://www.satsignal.eu/ntp/Raspberry-Pi-NTP.html
- https://store.uputronics.com/index.php?route=product/product&path=60_64&product_id=81
- http://rdlazaro.info/compu-Raspberry_Pi-RPi-stratum0.html
- http://mythopoeic.org/pi-ntp/
- https://raspberry.tips/raspberrypi-tutorials/raspberry-pi-uhrzeit-ueber-gps-beziehen-zeitserver/
- https://support.ntp.org/bin/view/Sandbox/HowtoPpsOnRaspberryPi
- https://learn.adafruit.com/adafruit-ultimate-gps-on-the-raspberry-pi/setting-everything-up
- https://raspberry.tips/raspberrypi-tutorials/gps-modul-mit-dem-raspberry-pi-ortung-und-navigation/
- https://wiki.ubuntuusers.de/gpsd/ -> Debugging...
2.2 Literature
- "Performance of GNSS Time of Arrival Estimation Techniques in Multipath Environments": http://plan.geomatics.ucalgary.ca/papers/ali_gnss08_22sep08.pdf
- "Delay estimation by FFT", Markus Nentwig, September 22, 2007: https://www.dsprelated.com/showarticle/26.php
Der Artikel erläutert die Theorie zu "Signal fitting with subsample resolution" von https://www.dsprelated.com/showcode/207.php
2.3 Files
3 On Problems I encountered
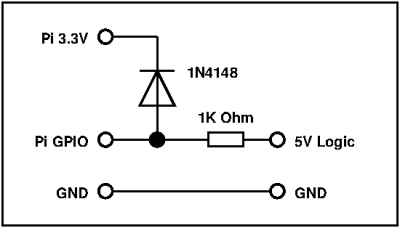
The Raspberry Pi GPIO voltage is 3,3V. I didn't know the exact voltage of the serial signals from the Trimble board, and I didn't know the exact voltage of the PPS. The Raspberry Pi does not have any overvoltage protection, so it was the occasion to think about a solution to protect my Raspi from becoming broken junk.
CMOS to Raspberry Pi:
- http://www.mikrocontroller.net/articles/Pegelwandler
- http://tansi.info/rp/interfacing5v.html
- http://www.allaboutcircuits.com/textbook/digital/chpt-3/logic-signal-voltage-levels/
- http://www.interfacebus.com/voltage_threshold.html
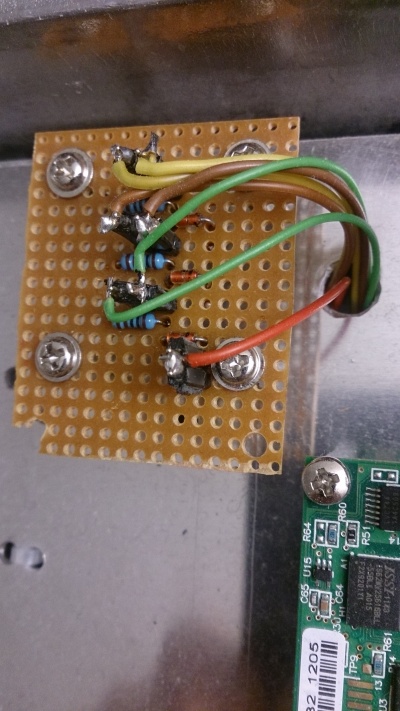
See the diagram below with the protection diode... I set up such a solution for all connections, no matter where they came from or went to. There is always a diode that causes a drop to no lower than 3v3 and secures the pin voltage to about 4,3V. Which is around ok for what my raspi can stand.
4 Implementation
4.1 OS Installation and Preparation
First of all I decided to use a minibian image:
https://sourceforge.net/projects/minibian/files/2016-03-12-jessie-minibian.tar.gz
because I don't want to create a really big thing. I just want to have an NTP server.
- Unpack, write it to the SD card, as described so often everywhere on almost every RPI page.
- Use gparted to resize the root partition to the rest of your SD card. We should not waste space.
- Log in using uid root pwd raspberry (default). Note that opposed to Raspian, there is no user "pi".
- apt-get update; apt-get upgrade and update the minibian image.
- Give it a nice hostname, editing the file /etc/hostname and reboot.
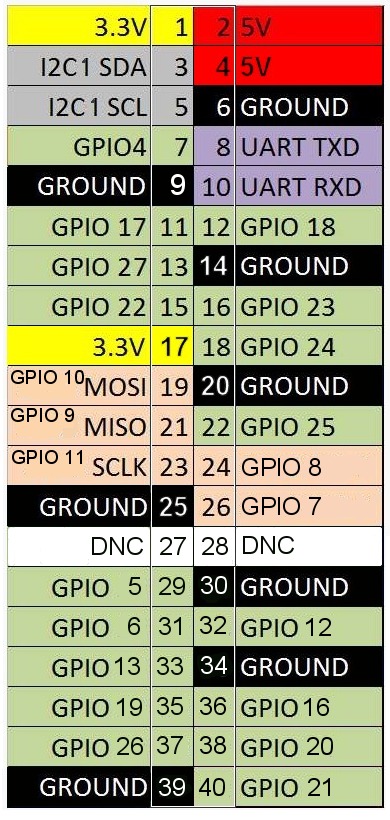
- Edit /boot/config.txt - Add dtoverlay=pps-gpio,gpiopin=18 on a new line. - Connect the PPS signal of the Sure board to this pin. Don't get the pin wrong :-)
As before, I connected the PPS with GPIO pin 18. In order to make this work, I edited the file /boot.config.txt...
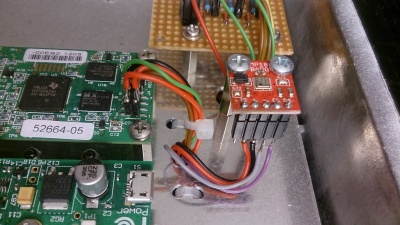
- I added another line to the boot'config.txt file: dtparam=i2c_arm=on because I have included an I2C sensor that gives me some more values.
Here is why: http://stackoverflow.com/questions/32021924/raspberry-pi-2-cannot-enable-dev-i2c-0
- Save the file...
- Edit the file /etc/modules to contain the following lines. Just paste them below what is there already:
i2c-bcm2708
i2c_dev
pps-gpio
- so to ensure that these modules will be loaded.
- Install the pps-tools:
apt-get install pps-tools
If you are using a BMP085 or a BMP180 sensor to grab some data as I do, then do this:
- Install the according i2c devices:
apt-get update
apt-get install i2c-tools      # I2C-Toolkit for commandline
apt-get install python-smbus   # Python library for I2C
apt-get install libi2c-dev     # library for C
apt-get install git            # need this later...
- Note here (German): http://www.netzmafia.de/skripten/hardware/RasPi/RasPi_I2C.html
- Configure the timezone using the command dpkg-reconfigure tzdata
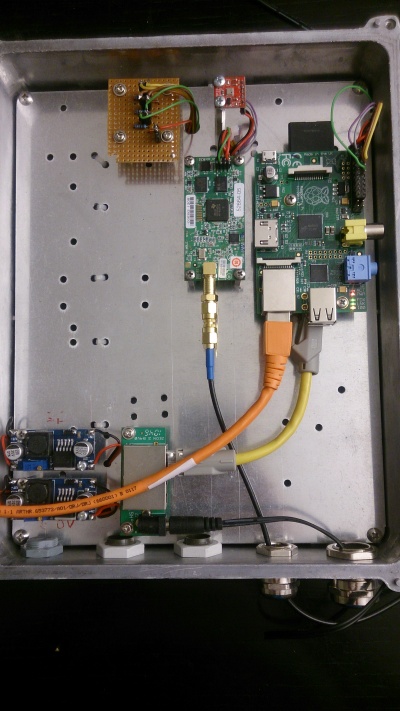
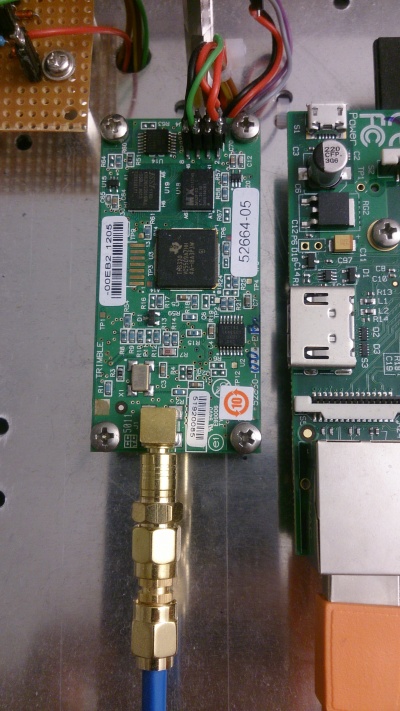
Now we're running into a difference to the previous project, because I am not using an external USB source, but I decided to connect the native Raspberry's UART.
Now Reboot. A device will be created during system startup: /dev/pps0 Check for it to be created. Another device will be created for the I2C stuff, see below.
If you connected the PPS, the following command will produce results like here:
root@ntp2:~# ppstest /dev/pps0
trying PPS source "/dev/pps0"
found PPS source "/dev/pps0"
ok, found 1 source(s), now start fetching data...
source 0 - assert 1462395271.608254834, sequence: 4022 - clear  0.000000000, sequence: 0
source 0 - assert 1462395272.608254999, sequence: 4023 - clear  0.000000000, sequence: 0
source 0 - assert 1462395273.608254163, sequence: 4024 - clear  0.000000000, sequence: 0
source 0 - assert 1462395274.608255327, sequence: 4025 - clear  0.000000000, sequence: 0
source 0 - assert 1462395275.608373487, sequence: 4026 - clear  0.000000000, sequence: 0
^C
root@ntp2:~#
If you get one of these lines every second, this means that your kernel is now disciplined by a PPS. It reacts to the pulse coming in, it recognizes the pulse properly. Congratulations! Note that it does not mean that your ntpd is using the PPS pulse! It just means that you are receiving a pulse by the kernel.
Now let's check for the I2C stuff: The device /dev/i2c-1 should have been created. If you also use the BMP sensor, you should find it as '77'. Once you got the sensor connected as described in the manuals, detect it:
i2cdetect -y 1
and it should show up as "77":
     0  1  2  3  4  5  6  7  8  9  a  b  c  d  e  f
00:          -- -- -- -- -- -- -- -- -- -- -- -- --
10: -- -- -- -- -- -- -- -- -- -- -- -- -- -- -- --
20: -- -- -- -- -- -- -- -- -- -- -- -- -- -- -- --
30: -- -- -- -- -- -- -- -- -- -- -- -- -- -- -- --
40: -- -- -- -- -- -- -- -- -- -- -- -- -- -- -- --
50: -- -- -- -- -- -- -- -- -- -- -- -- -- -- -- --
60: -- -- -- -- -- -- -- -- -- -- -- -- -- -- -- --
70: -- -- -- -- -- -- -- 77
Great!
4.2 NTP configuration
First of all, there is an agetty on the /dev/ttyAMA0 device. So we need to disable it and prevent it from starting up after next reboot:
systemctl stop serial-getty@ttyAMA0.service
systemctl disable serial-getty@ttyAMA0.service
systemctl mask serial-getty@ttyAMA0.service
The default NTP package is not sufficient, as I wrote above. It does not support reading the PPS from the kernel. It is quite disappointing if you did everything right and you're still not successful.
Though I recommend installing it first because we can prepare it nevertheless, using the command apt-get install ntp
Then edit the config file /etc/ntp.conf and make it look like this. Maybe it's agood idea to copy it to another filename and to have a reference: cp /etc/ntp.conf /etc/ntp.conf_orig. Now edit the /etc/ntp.conf: root@ntp1:/etc# cat /etc/ntp.conf
# /etc/ntp.conf, configuration for ntpd; see ntp.conf(5) for help

driftfile /var/lib/ntp/ntp.drift

# Enable this if you want statistics to be logged.
statsdir /var/log/ntpstats/

statistics loopstats peerstats clockstats
filegen loopstats file loopstats type day enable
filegen peerstats file peerstats type day enable
filegen clockstats file clockstats type day enable
filegen sysstats  file sysstats  type day link enable

tos  minsane 3
tos  orphan 10
tos  mindist 0.4

server 127.127.22.0 minpoll 4 prefer
fudge 127.127.22.0 refid PPS flag2 0 flag3 1

server 127.127.29.0 minpoll 4 prefer
fudge 127.127.29.0 time1 -17.8 refid GPS stratum 1
fudge 127.127.29.0 flag2 0

pool de.pool.ntp.org minpoll 10 iburst

# Access control configuration; see /usr/share/doc/ntp-doc/html/accopt.html for
# details.  The web page <http://support.ntp.org/bin/view/Support/AccessRestrictions>
# might also be helpful.
#
# Note that "restrict" applies to both servers and clients, so a configuration
# that might be intended to block requests from certain clients could also end
# up blocking replies from your own upstream servers.

# By default, exchange time with everybody, but don't allow configuration.
restrict -4 default kod notrap nomodify nopeer noquery
restrict -6 default kod notrap nomodify nopeer noquery

restrict        172.16.0.0  mask 255.240.0.0
restrict        192.168.0.0 mask 255.255.0.0

# Local users may interrogate the ntp server more closely.
restrict 127.0.0.1
restrict ::1
Since NTP is frequently writing to the SD card, I did a trick. The creation of the mount point /var/log/ntpstats will be done during package installation.
- Stop the daemon with service ntp stop
- Now delete the contents of this directory: rm /var/log/ntpstats/*
- Now add the following line to the file /etc/fstab and create a RAM disk
tmpfs /var/log/ntpstats tmpfs nodev,nosuid,size=10M 0 0
- It will cost 10 of your 512 MB RAM, but you didn't plan a high performance compute cluster anyway :-) If you want, you can easily add more. Occasional reboots will keep it empty anyway.
- Note that the process ntpd just consumes about 5 MBytes... So 512 is almost a waste of RAM. :-)
- Reboot.
Now let's check a couple of things:
- mount will show something like this:
tmpfs on /var/log/ntpstats type tmpfs (rw,nosuid,nodev,relatime,size=10240k)
- ntpq -p will show something like this:
 root@ntp1:/etc# ntpq -p
      remote           refid      st t when poll reach   delay   offset  jitter
 ==============================================================================
 *GPS_NMEA(0)     .GPS.            1 l    7   16  377    0.000    1.300  11.017
 -test.danzuck.ch 162.23.41.56     2 u  712 1024  377   20.054   -0.302   1.833
 +stratum2-3.NTP. 129.70.130.70    2 u  288 1024  377   31.598    2.897   0.542
 +static.5-9-80-1 213.239.239.165  3 u  448 1024  377   21.270    1.829   0.854
 -ns2.bvc-cloud.d 109.75.188.245   3 u  212 1024  377   23.095    0.746   0.502
- Note that there is probably no line containing anything about PPS.
- Though this output already tells us that our NTP server is keeping a more or less precise time. Good enough for your alarm clock in the morning for sure :-)
- Now let's add PPS support. Here is a good reference page: https://raspberry.tips/raspberrypi-tutorials/raspberry-pi-uhrzeit-ueber-gps-beziehen-zeitserver/
- Since the recent minibian is based on jessie rather than on wheezy:
sh -c 'echo "deb-src http://mirrordirector.raspbian.org/raspbian/ jessie main contrib non-free rpi" >> /etc/apt/sources.list'
apt-get update
- Get the build dependencies and the source code of the package:
cd ~
apt-get -y build-dep ntp
apt-get -y source ntp
- The source code was stored in my home directory. In the moment and for me it is the version ntp-4.2.6.p5+dfsg. Note that it could be different for you.
cd ntp-4.2.6.p5+dfsg/debian/
- Edit the rules file and add the missing support for PPS/ATOM. Search for configure and append a line at the end of the statement. Don't forget the \ at the end of the previous line.
./configure CFLAGS='$(CFLAGS)' CPPFLAGS='$(CPPFLAGS)' LDFLAGS='$(LDFLAGS)' \
               --prefix=/usr \
               --enable-all-clocks --enable-parse-clocks --enable-SHM \
               --disable-debugging --sysconfdir=/var/lib/ntp \
               --with-sntp=no \
               --with-lineeditlibs=edit \
               --without-ntpsnmpd \
               --disable-local-libopts \
               --enable-ntp-signd \
               --disable-dependency-tracking \
               --with-openssl-libdir=/usr/lib/$(DEB_HOST_MULTIARCH) \
               --enable-ATOM
- Now add the changelog file so that it reflects the change:
ntp (1:4.2.6.p5+dfsg-7+deb8u1) jessie-security; urgency=medium
- into:
ntp (1:4.2.6.p5+dfsg-8+deb8u1) jessie-security; urgency=medium
- Now 'cd' into the package directory and build the package.
cd ..
sudo dpkg-buildpackage -b
- It will take a while now. In my case three deb files were created:
root@ntp2:~# ls -ltr *deb
-rw-r--r-- 1 root root 1030546 May  4 23:14 ntp-doc_4.2.6.p5+dfsg-8+deb8u1_all.deb
-rw-r--r-- 1 root root  350312 May  4 23:17 ntp_4.2.6.p5+dfsg-8+deb8u1_armhf.deb
-rw-r--r-- 1 root root   68844 May  4 23:17 ntpdate_4.2.6.p5+dfsg-8+deb8u1_armhf.deb
root@ntp2:~#
- Now restart the ntp server with the command service ntp restart and after ~ 1 minute it should give you this output using ntpq -p:
root@ntp2:~# ntpq -p
     remote           refid      st t when poll reach   delay   offset  jitter
==============================================================================
 PPS(0)          .PPS.            0 l    3   16  377    0.000  360.496   2.939
*lite.computer   .PPS.            1 u  616 1024    1   50.043    4.338  72.743
+public.streikt. 192.53.103.108   2 u  615 1024    1   23.819    1.246   0.965
-muenchen.klaus- 129.70.132.34    3 u  614 1024    1   29.009    9.956   0.614
+fry.celeborn.de 192.53.103.108   2 u  613 1024    1   23.976    2.342   0.982
root@ntp2:~#
- The offset of our PPS source is gigantic and there is some considerable jitter. It is because I still have no antenna and the SMT cannot have a fix under any circumstances. But though, we see that the signals are coming in.
- For now, we're still missing a GPS signal...
- In order to ensure that the self-created NTP package will not be updated and overwritten next time if a new ntp package is available, you must ensure that the ntp package will be put on hold:
apt-mark hold ntp
- Ensure that the ntpdate package will not block the startup of the ntp daemon.
- Ideally, just remove this package
- Alternatively you can insert an "exit 0" line right after the header of the start script.
- Create a symbolic link. We're going to use the driver Nr. 29:
root@ntp2:~# ln -s /dev/ttyAMA0 /dev/palisade0
- For further info check here:
- I did a simple trick: I edited the start script so that the symlink will be recreated every time ntp starts up:
#!/bin/sh

### BEGIN INIT INFO
# Provides:        ntp
# Required-Start:  $network $remote_fs $syslog
# Required-Stop:   $network $remote_fs $syslog
# Default-Start:   2 3 4 5
# Default-Stop:
# Short-Description: Start NTP daemon
### END INIT INFO

if ! [ -e /dev/palisade0 ]; then
        ln -s /dev/ttyAMA0 /dev/palisade0
fi

PATH=/sbin:/bin:/usr/sbin:/usr/bin

. /lib/lsb/init-functions

DAEMON=/usr/sbin/ntpd
PIDFILE=/var/run/ntpd.pid

(...)
- Edit the file /etc/ntp.conf and edit the following lines:
server 127.127.29.0 minpoll 4 prefer
fudge 127.127.20.0 time2 0.1 refid GPS stratum 1
- Note: still uncalibrated, and still without antenna...
- Now the ntpq -p command produces this:
root@ntp2:~# ntpq -p
     remote           refid      st t when poll reach   delay   offset  jitter
==============================================================================
 PPS(0)          .PPS.            0 l    -   16    0    0.000    0.000   0.000
 GPS_PALISADE(0) .GPS.            0 l    -   16    0    0.000    0.000   0.000
 wotan.tuxli.ch  235.106.237.243  3 u    - 1024    1   24.452  -44.328   0.001
 net1.uni-paderb .INIT.          16 u    - 1024    0    0.000    0.000   0.001
 ns3.customer-re .INIT.          16 u    - 1024    0    0.000    0.000   0.001
 web1.sys.ccs-ba .INIT.          16 u    - 1024    0    0.000    0.000   0.001
root@ntp2:~#
- If you wonder about the 377 reach value, then check this: http://www.linuxjournal.com/article/6812
4.3 System considerations concerning DHCP
In case you retrieve your IP configuration via DHCP, there is a default statement to also retrieve the according NTP server config: You will want to exclude that!
Edit the file /etc/dhcp/dhclient.conf and remove the string ntp-servers from the line behind the request keyword.
Then remove the file /var/lib/ntp/ntp.conf.dhcp.
You can also remove the file /etc/dhcp/dhclient-exit-hooks.d/ntp
4.4 Debugging
I did have some considerations on the question if I could receive some data from the Trimble resolution T device at all until I found out that the agetty was still occupying the line.
gpsd helps for a diagnosis:
gpsd -n -N -D4 /dev/ttyAMA0
will bring you this if everything works:
root@ntp2:~# gpsd -n -N -D4 /dev/ttyAMA0
gpsd:INFO: launching (Version 3.11)
gpsd:INFO: listening on port gpsd
gpsd:PROG: NTPD shmat(0,0,0) succeeded, segment 0
gpsd:PROG: NTPD shmat(32769,0,0) succeeded, segment 1
gpsd:PROG: NTPD shmat(65538,0,0) succeeded, segment 2
gpsd:PROG: NTPD shmat(98307,0,0) succeeded, segment 3
gpsd:PROG: successfully connected to the DBUS system bus
gpsd:PROG: shmat() succeeded, segment 131076
gpsd:PROG: shared-segment creation succeeded,
gpsd:INFO: stashing device /dev/ttyAMA0 at slot 0
gpsd:INFO: opening GPS data source type 2 at '/dev/ttyAMA0'
gpsd:INFO: speed 9600, 8N1
gpsd:PROG: writing oncore control type Cj
gpsd:PROG: Probing "Garmin USB binary" driver...
gpsd:PROG: Probe not found "Garmin USB binary" driver...
gpsd:PROG: Probing "GeoStar" driver...
gpsd:PROG: Sent GeoStar packet id 0xc1
gpsd:PROG: Probe not found "GeoStar" driver...
gpsd:PROG: Probing "Trimble TSIP" driver...
gpsd:INFO: speed 9600, 8O1
gpsd:PROG: writing oncore control type Cj
gpsd:PROG: Probe found "Trimble TSIP" driver...
gpsd:INFO: gpsd_activate(2): activated GPS (fd 6)
gpsd:PROG: PPS chrony socket /var/run/chrony.ttyAMA0.sock doesn't exist
gpsd:INFO: KPPS checking /sys/devices/virtual/pps/pps0/path,
gpsd:INFO: KPPS checking /sys/devices/virtual/pps/pps1/path, /dev/ttyAMA0
gpsd:INFO: KPPS RFC2783 fd is 7
gpsd:INFO: KPPS caps 1133
gpsd:WARN: KPPS kernel PPS will be used
gpsd:PROG: PPS thread launched
gpsd:INFO: NTPD ntpshm_link_activate: 1
gpsd:INFO: device /dev/ttyAMA0 activated
gpsd:INFO: running with effective group ID 20
gpsd:INFO: running with effective user ID 107
gpsd:INFO: startup at 2016-05-06T16:16:56.000Z (1462551416)
gpsd:PROG: GPS Time 490634 1895 17
gpsd:PROG: Sent TSIP packet id 0x24
gpsd:PROG: Sent TSIP packet id 0x28
gpsd:PROG: Sent TSIP packet id 0x3c
gpsd:PROG: Sent TSIP packet id 0x26
gpsd:WARN: Received packet of type 28 cannot be parsed
gpsd:INFO: Satellite Tracking Status: Ch  0 PRN   2 Res 0 Acq 0 Eph  1 SNR  0.0 LMT 490634.1250 El 17.7 Az  43.7
gpsd:INFO: Satellite Tracking Status: Ch  1 PRN  29 Res 0 Acq 1 Eph  1 SNR 39.7 LMT 490634.1250 El 75.9 Az  45.3
gpsd:INFO: Satellite Tracking Status: Ch  2 PRN   5 Res 0 Acq 0 Eph  0 SNR  0.0 LMT 490634.1250 El 14.8 Az  80.3
gpsd:INFO: Satellite Tracking Status: Ch  3 PRN  12 Res 0 Acq 0 Eph  1 SNR  0.0 LMT 490634.1250 El 13.8 Az 113.6
gpsd:INFO: Satellite Tracking Status: Ch  4 PRN  31 Res 0 Acq 0 Eph  1 SNR  0.0 LMT 490634.1250 El 55.4 Az 260.5
gpsd:INFO: Satellite Tracking Status: Ch  5 PRN  21 Res 0 Acq 0 Eph  1 SNR  0.0 LMT 490634.1250 El 31.4 Az 186.3
gpsd:INFO: Satellite Tracking Status: Ch  6 PRN  25 Res 0 Acq 0 Eph  1 SNR  0.0 LMT 490634.1250 El 49.1 Az 113.6
gpsd:INFO: Satellite Tracking Status: Ch  7 PRN  26 Res 0 Acq 0 Eph  0 SNR  0.0 LMT 490634.1250 El 28.9 Az 298.9
gpsd:INFO: Satellite Tracking Status: Ch  8 PRN  20 Res 0 Acq 0 Eph  0 SNR  0.0 LMT 490634.1250 El  9.5 Az 126.0
gpsd:INFO: Satellite Tracking Status: Ch  9 PRN  13 Res 0 Acq 0 Eph  0 SNR  0.0 LMT 490634.1250 El -38.2 Az  98.9
gpsd:INFO: Satellite Tracking Status: Ch 10 PRN  19 Res 0 Acq 0 Eph  1 SNR  0.0 LMT 490634.1250 El -37.3 Az  66.0
gpsd:INFO: Satellite Tracking Status: Ch 11 PRN   8 Res 0 Acq 0 Eph  0 SNR  0.0 LMT 490634.1250 El -42.6 Az 246.8
gpsd:PROG: Receiver health 08 01
gpsd:INFO: Machine ID 00 02 01
gpsd:PROG: Switching to Super Packet mode
gpsd:PROG: Sent TSIP packet id 0x35
gpsd:INFO: IO Options 2c 00 00 08
gpsd:PROG: Sent TSIP packet id 0x8e
gpsd:PROG: Sent TSIP packet id 0x8e
gpsd:WARN: Received packet of type 8e cannot be parsed
gpsd:WARN: No Compact Super Packet, use LFwEI
gpsd:PROG: Sent TSIP packet id 0x8e
^Cgpsd:WARN: received terminating signal 2.
gpsd:INFO: speed 9600, 9gpsd:INFO: closing GPS=/dev/ttyAMA0 (6)
gpsd:PROG: no /etc/gpsd/device-hook present, skipped running DEACTIVATE hook
gpsd:WARN: exiting.
root@ntp2:~#
Notes: This is the command line before the modified ntp installation
ntp 1474 1 0 01:10 ? 00:00:00 /usr/sbin/ntpd -p /var/run/ntpd.pid -g -c /var/lib/ntp/ntp.conf.dhcp -u 104:108
And after removal of the /var/lib/ntp/ntp.conf.dhcp file:
ntp 1539 1 2 01:27 ? 00:00:00 /usr/sbin/ntpd -p /var/run/ntpd.pid -g -u 104:108
Here is the ntpq -p output as it should look like:
root@ntp2:~# ntpq -p
     remote           refid      st t when poll reach   delay   offset  jitter
==============================================================================
oPPS(0)          .PPS.            0 l   15   16  377    0.000    0.263   0.016
*GPS_PALISADE(0) .GPS.            1 l   12   16  377    0.000    0.072   0.007
-fry.celeborn.de 192.53.103.104   2 u  481 1024    1   23.313   -0.792  10.685
+x.ns.gin.ntt.ne 249.224.99.213   2 u  480 1024    1   18.789    8.024  12.722
-loreley.flyingp 161.62.157.173   3 u  479 1024    1   23.912   -0.226   9.775
+ntp1.wtnet.de   10.129.40.211    2 u  478 1024    1   39.497    8.488  11.803
root@ntp2:~#
And here is some info about the output of the ntpq -p command. Taken from here: http://nlug.ml1.co.uk/2012/01/ntpq-p-output/831
Table headings:

   remote – The remote peer or server being synced to. “LOCAL” is this local host (included in case there are no remote peers or servers available);
   refid – Where or what the remote peer or server is itself synchronised to;
   st – The remote peer or server Stratum
   t – Type (u: unicast or manycast client, b: broadcast or multicast client, l: local reference clock, s: symmetric peer, A: manycast server, B: broadcast server, M: multicast server, see “Automatic Server Discovery“);
   when – When last polled (seconds ago, “h” hours ago, or “d” days ago);
   poll – Polling frequency: rfc5905 suggests this ranges in NTPv4 from 4 (16s) to 17 (36h) (log2 seconds), however observation suggests the actual displayed value is seconds for a much smaller range of 64 (26) to 1024 (210) seconds;
   reach – An 8-bit left-shift shift register value recording polls (bit set = successful, bit reset = fail) displayed in octal;
   delay – Round trip communication delay to the remote peer or server (milliseconds);
   offset – Mean offset (phase) in the times reported between this local host and the remote peer or server (RMS, milliseconds);
   jitter – Mean deviation (jitter) in the time reported for that remote peer or server (RMS of difference of multiple time samples, milliseconds);

Select Field tally code:

The first character displayed in the table (Select Field tally code) is a state flag (see Peer Status Word) that follows the sequence ” “, “x”, “-“, “#”, “+”, “*”, “o”:

   ” ” – No state indicated for:
       non-communicating remote machines,
       “LOCAL” for this local host,
       (unutilised) high stratum servers,
       remote machines that are themselves using this host as their synchronisation reference;
   “x” – Out of tolerance, do not use (discarded by intersection algorithm);
   “–” – Out of tolerance, do not use (discarded by the cluster algorithm);
   “#” – Good remote peer or server but not utilised (not among the first six peers sorted by synchronization distance, ready as a backup source);
   “+” – Good and a preferred remote peer or server (included by the combine algorithm);
   “*” – The remote peer or server presently used as the primary reference;
   “o” – PPS peer (when the prefer peer is valid). The actual system synchronization is derived from a pulse-per-second (PPS) signal, either indirectly via the PPS reference clock driver or directly via kernel interface.
4.5 Precision
Here is some information about precision: http://www.ntp.org/ntpfaq/NTP-s-sw-clocks-quality.htm
My precision is 2^-20, so I'm in the sub-microsecond area:
root@ntp2:~# ntpq -c rl
associd=0 status=0118 leap_none, sync_pps, 1 event, no_sys_peer,
version="ntpd 4.2.6p5@1.2349-o Fri May  6 10:40:54 UTC 2016 (1)",
processor="armv6l", system="Linux/4.1.19+", leap=00, stratum=1,
precision=-20, rootdelay=0.000, rootdisp=70.275, refid=PPS,
reftime=dad744ee.332cd7cf  Fri, May  6 2016 17:29:34.199,
clock=dad744f2.80a5050b  Fri, May  6 2016 17:29:38.502, peer=51127, tc=4,
mintc=3, offset=0.000, frequency=0.000, sys_jitter=2.887,
clk_jitter=60.963, clk_wander=0.000
root@ntp2:~#
4.6 Analytics and Display
https://www.eecis.udel.edu/~mills/ntp/html/monopt.html
Well, I'm mostly interested in the precision of my clock. Therefore I am evaluating the loopstats file.
I am running a GNUPLOT script which generates a new set of graphs every 10 minutes and stores them under /var/www/html/images. Needless to say that this directory is the mountpoint of a tmpfs space of 10 MBytes.
Here's the GNUPlot manual: http://www.gnuplot.info/docs_5.0/gnuplot.pdf
The file /etc/crontab gets another line:
*/10 * * * * root /usr/local/bin/prep_charts.sh
which triggers the script named at the end of the line. Here are the contents of this script:
#!/usr/bin/gnuplot

set terminal png size 1600,800
set grid
set bars 0.4
set yrange [-0.2:0.2]
#set y2tics
#set y2range [0:]
set ytics nomirror
set xdata time
set timefmt "%s"
set format x "%T"
set title "NTP statistics"
set ylabel "Clock offset / Roundtrip delay (ms)"
set y2label "Frequency offset (seconds per day)"
set xlabel "Time of day"
local_time = `date +%s --utc -d "12:00:00 $(date +%z)"`
utc_time   = `date +%s --utc -d "12:00:00"`
localdifferencefromUTC = utc_time - local_time
timeoffsettoday = `date +%s --utc -d "today 0:00"` + localdifferencefromUTC
set output "/var/www/html/images/ntp.png"
plot \
  "/var/log/ntpstats/loopstats" u ($2+timeoffsettoday):($3*1000):($5*1000/2) t "Clock offset" w errorlines lt 1 lw 2 pt 187, \
#  "/var/log/ntpstats/peerstats" u ($2+timeoffsettoday):($6*1000):($8*1000/2) t "Roundtrip delay" w errorbars lt 26 pt 26,\
  "/var/log/ntpstats/loopstats" u ($2+timeoffsettoday):($4*0.0864):($6*0.0864/2) axes x1y2 t "Frequency offset" w errorline lt 7 pt 65,\
  0 w l lt -1
