Red Pitaya Based WSPR Beacon for Antarctica DP0GVN: Unterschied zwischen den Versionen
Dl8rds (Diskussion | Beiträge) (→Purchased) |
Dl8rds (Diskussion | Beiträge) (→Preamplifier control) |
||
| (32 dazwischenliegende Versionen desselben Benutzers werden nicht angezeigt) | |||
| Zeile 1: | Zeile 1: | ||
== Project Scope == | == Project Scope == | ||
| − | + | We want to deploy a WSPR beacon in Antarctica. There are two phases of the project: | |
| + | |||
| + | # Deployment of an initial version | ||
| + | # Deployment of a higher integrated version | ||
| + | |||
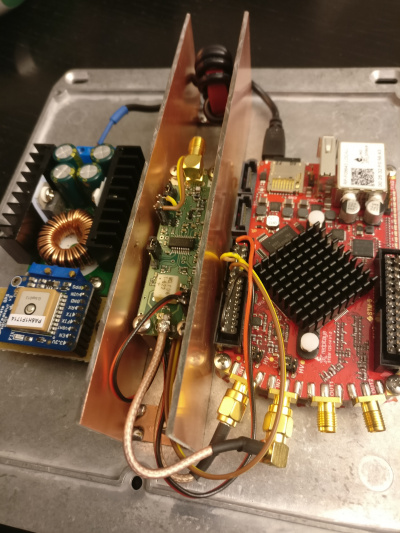
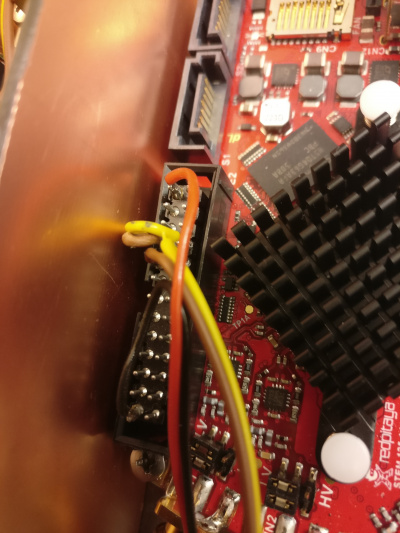
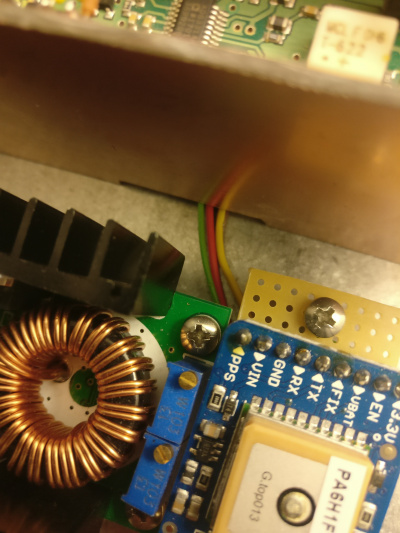
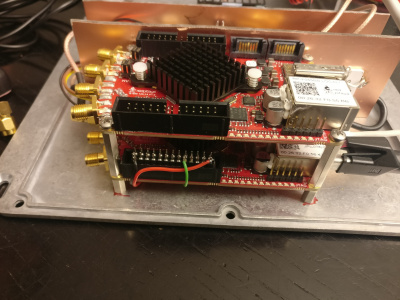
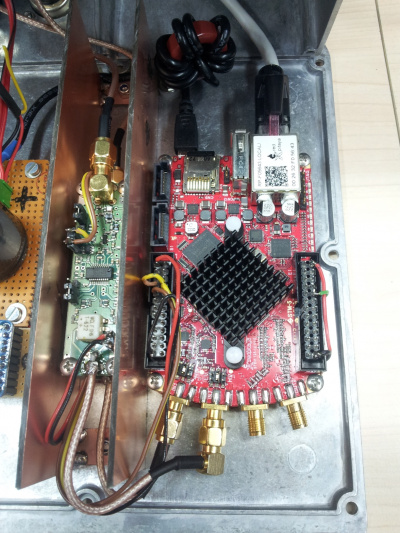
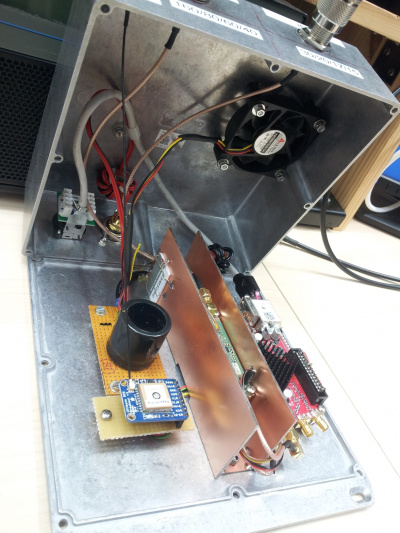
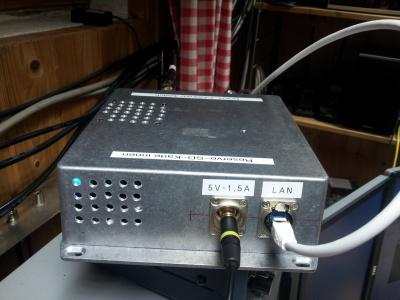
| + | I have the honor to design the initial version, only with one Red Pitaya. Pictures below. | ||
| + | |||
| + | Here is the link to the Project Main Site: | ||
| + | |||
| + | https://dl0ht.fk4.hs-bremen.de/polarbake/index.html | ||
| + | |||
| + | == Important Links == | ||
| + | |||
| + | * https://learn.adafruit.com/adafruit-ultimate-gps-on-the-raspberry-pi/using-uart-instead-of-usb | ||
| + | * http://www.danmandle.com/blog/getting-gpsd-to-work-with-python/ | ||
| + | * http://www.itechlounge.net/2017/10/linux-how-to-add-rc-local-in-debian-9/ | ||
| + | * http://www.box73.de/product_info.php?products_id=3737 | ||
| + | |||
| + | == Credits == | ||
| + | |||
| + | Thanks to: | ||
| + | |||
| + | * Michael Hartje DK5HH for comprehensive support regarding Pitaya and FPGA code | ||
| + | * Rainer Englert DF2NU for support on construction details | ||
| + | * Christian Reiber DL8MDW for the transmitter (well, this is not so much related to my part, but nevertheless) | ||
| + | * Felix Riess DL5XL for setting it up in Antarctica | ||
| + | |||
| + | == The Transmitter == | ||
| + | |||
| + | Here are the documents of Christian Reiber DL8MDW, who built the WSPR transmitter: | ||
| + | |||
| + | * [[Datei:Inbetriebnahme.pdf]] | ||
| + | * [[Datei:Betrieb.pdf]] | ||
| + | * [[Datei:U3S_Operation_Manual-3.09d.pdf]] | ||
| + | |||
| + | == Software == | ||
| + | |||
| + | === System Config === | ||
| + | |||
| + | https://russ.garrett.co.uk/2009/01/01/linux-kernel-tuning/ | ||
| + | |||
| + | Modification of the file '''/etc/sysctl.conf''' | ||
| + | |||
| + | vm.min_free_kbytes = 32678 | ||
| + | |||
| + | This tells the kernel to try and keep 32MB of RAM free at all times. It’s useful in two main cases: | ||
| + | |||
| + | Swap-less machines, where you don’t want incoming network traffic to overwhelm the kernel and force an OOM before it has time to flush any buffers. | ||
| + | x86 machines, for the same reason: the x86 architecture only allows DMA transfers below approximately 900MB of RAM. So you can end up with the bizarre situation of an OOM error with tons of RAM free. | ||
| + | |||
| + | vm.swappiness = 0 | ||
| + | |||
| + | It’s said that altering swappiness can help you when you’re running under high memory pressure with software that tries to do its own memory management (i.e. MySQL). We’ve had limited success with this and I’d much prefer to use software which doesn’t pretend to know more about your hardware than the OS (i.e. PostgreSQL). | ||
| + | |||
| + | === Network Config === | ||
| + | |||
| + | IP-Adresse: 192.168.33.90 bis 192.168.33.95 | ||
| + | Netzmaske: 255.255.255.0 | ||
| + | Gateway: 192.168.33.254 | ||
| + | Nameserver (DNS): 192.168.38.46 | ||
| + | Timeserver (NTC): 192.168.33.40 | ||
| + | Timezone: UTC | ||
| + | |||
| + | Call: DP0GVN | ||
| + | GRID: IB59UH | ||
| + | |||
| + | File '''/etc/resolv.conf''': | ||
| + | |||
| + | nameserver 192.168.38.46 | ||
| + | |||
| + | File '''/etc/network/interfaces.d/eth0''': | ||
| + | |||
| + | iface eth0 inet static | ||
| + | address 192.168.33.90 | ||
| + | netmask 255.255.255.0 | ||
| + | gateway 192.168.33.254 | ||
| + | |||
| + | File '''/etc/ntp.conf''': | ||
| + | |||
| + | # add a server entry: | ||
| + | server 192.168.33.40 | ||
| + | |||
| + | # outcomment the pool entries: | ||
| + | # pool 0.debian.pool.ntp.org iburst | ||
| + | # pool 1.debian.pool.ntp.org iburst | ||
| + | # pool 2.debian.pool.ntp.org iburst | ||
| + | # pool 3.debian.pool.ntp.org iburst | ||
| + | |||
| + | (leave the rest as it is) | ||
| + | |||
| + | === Band Config === | ||
| + | |||
| + | cat write-c2-files.cfg | ||
| + | |||
| + | // frequency correction, from -100.0 ppm to +100.0 ppm | ||
| + | corr = 0.93; | ||
| + | |||
| + | // comma separated list of bands | ||
| + | // trailing commas are not allowed | ||
| + | bands = ( | ||
| + | // { freq = 0.137500; chan = 1; }, | ||
| + | // { freq = 0.475700; chan = 1; }, | ||
| + | { freq = 1.838100; chan = 1; }, | ||
| + | { freq = 3.594100; chan = 1; }, | ||
| + | { freq = 5.288700; chan = 1; }, | ||
| + | { freq = 7.040100; chan = 1; }, | ||
| + | { freq = 10.140200; chan = 2; }, | ||
| + | { freq = 14.097100; chan = 2; }, | ||
| + | { freq = 18.106100; chan = 2; }, | ||
| + | { freq = 21.096100; chan = 2; } | ||
| + | // { freq = 24.926100; chan = 1; }, | ||
| + | // { freq = 28.126100; chan = 1; }, | ||
| + | // { freq = 50.294500; chan = 1; } | ||
| + | ); | ||
| + | |||
| + | === Temperature Control === | ||
| + | |||
| + | We found that the CPU is becoming really hot and the board smells like burned electronics :-) Not good. | ||
| + | |||
| + | Accordingly a fan solution was created. Here is an interesting recommendation how to do that: | ||
| + | |||
| + | * https://rroeng.blogspot.de/2014/03/keep-your-red-pitaya-cool.html | ||
| + | * http://redpitaya.readthedocs.io/en/latest/developerGuide/125-14/cooling.html | ||
| + | |||
| + | In order to read out the CPU temperature, I found a little script. Note that it requires the installation of the "bc" package. | ||
| + | |||
| + | root@pitaya1:~# cat get_temp.sh | ||
| + | #!/bin/sh | ||
| + | # | ||
| + | # from http://www.kkn.net/~n6tv/xadc.sh | ||
| + | # updated by Michael Hirsch, Ph.D. | ||
| + | # | ||
| + | # works in Ash (Red Pitaya ecosystem 0.95) and Bash (ecosystem 0.97) | ||
| + | |||
| + | # path to IIO device | ||
| + | XADC_PATH=/sys/bus/iio/devices/iio:device0 | ||
| + | |||
| + | # Note: used "cat" to work in Ash instead of the typically recommended Bash "<". | ||
| + | |||
| + | OFF=$(cat $XADC_PATH/in_temp0_offset) | ||
| + | RAW=$(cat $XADC_PATH/in_temp0_raw) | ||
| + | SCL=$(cat $XADC_PATH/in_temp0_scale) | ||
| + | |||
| + | FORMULA="(($OFF+$RAW)*$SCL)/1000.0" | ||
| + | VAL=$(echo "scale=2;${FORMULA}" | bc) | ||
| + | echo "in_temp0 = ${VAL} °C" | ||
| + | |||
| + | |||
| + | === Preamplifier control === | ||
| + | |||
| + | The preamplifier we are using is this one: | ||
| + | |||
| + | http://www.box73.de/product_info.php?products_id=3737 | ||
| + | |||
| + | Here is the datasheet: [[Image:2018-01-20-RedPitaya-Vorverstaerker.pdf]] | ||
| + | |||
| + | We are using two preaplifiers. Pavel Demin's '''i2c-write''' command only allows to address one single preamp. For this reason, we duplicated this code. The original code was renamed into '''i2c-write-60''' since the I2C bus ID of the preamp is 60 and 61. The duplicated code was edited accordingly and the binary was saved into the file '''i2c-write-61'''. | ||
| + | |||
| + | <pre> | ||
| + | root@pitaya1:~# cat i2c-write-61.c | ||
| + | #include <stdio.h> | ||
| + | #include <stdint.h> | ||
| + | #include <stdlib.h> | ||
| + | #include <unistd.h> | ||
| + | #include <errno.h> | ||
| + | #include <fcntl.h> | ||
| + | #include <sys/ioctl.h> | ||
| + | |||
| + | #define I2C_SLAVE 0x0703 /* Use this slave address */ | ||
| + | #define I2C_SLAVE_FORCE 0x0706 /* Use this slave address, even if it | ||
| + | is already in use by a driver! */ | ||
| + | |||
| + | #define ADDR_DAC0 0x60 /* MCP4725 address 0 */ | ||
| + | #define ADDR_DAC1 0x61 /* MCP4725 address 1 */ | ||
| + | |||
| + | int main(int argc, char *argv[]) | ||
| + | { | ||
| + | int fd; | ||
| + | char *end; | ||
| + | long number; | ||
| + | uint8_t buffer[2]; | ||
| + | |||
| + | errno = 0; | ||
| + | number = (argc == 2) ? strtol(argv[1], &end, 10) : -1; | ||
| + | if(errno != 0 || end == argv[1] || number < 0 || number > 4095) | ||
| + | { | ||
| + | printf("Usage: i2c-write [0-4095]\n"); | ||
| + | return EXIT_FAILURE; | ||
| + | } | ||
| + | |||
| + | if((fd = open("/dev/i2c-0", O_RDWR)) >= 0) | ||
| + | { | ||
| + | if(ioctl(fd, I2C_SLAVE_FORCE, ADDR_DAC1) >= 0) | ||
| + | { | ||
| + | buffer[0] = number >> 8; | ||
| + | buffer[1] = number; | ||
| + | if(write(fd, buffer, 2) > 0) return EXIT_SUCCESS; | ||
| + | } | ||
| + | } | ||
| + | |||
| + | return EXIT_FAILURE; | ||
| + | } | ||
| + | </pre> | ||
| + | |||
| + | Compilation is easy: | ||
| + | |||
| + | gcc i2c-write-61.c -o i2c-write-61 | ||
| + | |||
| + | === Receiver Initialization === | ||
| + | |||
| + | In order to load the FPGA code and in order to initialize the preamplifiers, a start script was created: | ||
| + | |||
| + | <pre> | ||
| + | root@pitaya1:~# cat /etc/rc.local | ||
| + | #!/bin/sh -e | ||
| + | cat /root/sdr_transceiver_wspr.bit > /dev/xdevcfg | ||
| + | /root/i2c-write-60 4095 | ||
| + | /root/i2c-write-61 4095 | ||
| + | exit 0 | ||
| + | </pre> | ||
| + | |||
| + | To ensure that the script is activated on boot, the following file must be created and the service must be enabled. See this link: | ||
| + | |||
| + | http://www.itechlounge.net/2017/10/linux-how-to-add-rc-local-in-debian-9/ | ||
| + | |||
| + | <pre> | ||
| + | root@pitaya1:/# cat /etc/systemd/system/rc-local.service | ||
| + | [Unit] | ||
| + | Description=/etc/rc.local | ||
| + | ConditionPathExists=/etc/rc.local | ||
| + | |||
| + | [Service] | ||
| + | Type=forking | ||
| + | ExecStart=/etc/rc.local start | ||
| + | TimeoutSec=0 | ||
| + | StandardOutput=tty | ||
| + | RemainAfterExit=yes | ||
| + | SysVStartPriority=99 | ||
| + | |||
| + | [Install] | ||
| + | WantedBy=multi-user.target | ||
| + | </pre> | ||
| + | |||
| + | And then, make executable: | ||
| + | |||
| + | chmod +x /etc/rc.local | ||
| + | |||
| + | Enable on boot: | ||
| + | |||
| + | systemctl enable rc-local | ||
| + | |||
| + | Invoke the script, make sureyou don't get any errors: | ||
| + | |||
| + | systemctl start rc-local.service | ||
| + | |||
| + | If you hit errors, check it again: | ||
| + | |||
| + | systemctl status rc-local.service | ||
== Shopping List == | == Shopping List == | ||
| Zeile 48: | Zeile 305: | ||
=== Open Items === | === Open Items === | ||
| + | * Flachsteckhülsen | ||
| + | * 2,5m² Kabelverbinder | ||
* 19" 2HE Metal Case | * 19" 2HE Metal Case | ||
: https://www.conrad.de/de/19-zoll-baugruppentraeger-4365-x-200-stahlblech-schroff-multipacpro-20860-120-1-st-546378.html | : https://www.conrad.de/de/19-zoll-baugruppentraeger-4365-x-200-stahlblech-schroff-multipacpro-20860-120-1-st-546378.html | ||
| Zeile 83: | Zeile 342: | ||
: https://www.reichelt.de/?ARTICLE=101942&PROVID=2788&wt_mc=amc141526782519998&gclid=EAIaIQobChMI-fCrua7B1QIVbRHTCh3cCQjfEAQYASABEgJ7D_D_BwE | : https://www.reichelt.de/?ARTICLE=101942&PROVID=2788&wt_mc=amc141526782519998&gclid=EAIaIQobChMI-fCrua7B1QIVbRHTCh3cCQjfEAQYASABEgJ7D_D_BwE | ||
* 28 Freilaufdioden | * 28 Freilaufdioden | ||
| − | |||
=== Provided to the project === | === Provided to the project === | ||
| Zeile 94: | Zeile 352: | ||
* 1x Neutrik RJ45 thru: 9 € | * 1x Neutrik RJ45 thru: 9 € | ||
* Mikrotik RB750GL: 55 € | * Mikrotik RB750GL: 55 € | ||
| + | |||
| + | Total: 125 € | ||
=== Purchased === | === Purchased === | ||
| Zeile 103: | Zeile 363: | ||
* 2x Überspannungsableiter Telegärtner J01028A0044: 142 € | * 2x Überspannungsableiter Telegärtner J01028A0044: 142 € | ||
* Schroff multipacPro 20860-127 2HE 340T: 102,60 € | * Schroff multipacPro 20860-127 2HE 340T: 102,60 € | ||
| + | |||
| + | == Images == | ||
| + | |||
| + | === Phase 1 === | ||
| + | |||
| + | [[Image:2017-12-20-wspr-bake_1.jpg|400px]] | ||
| + | [[Image:2017-12-20-wspr-bake_2.jpg|400px]] | ||
| + | |||
| + | [[Image:2017-12-20-wspr-bake_3.jpg|400px]] | ||
| + | [[Image:2017-12-20-wspr-bake_4.jpg|400px]] | ||
| + | |||
| + | [[Image:2017-12-20-wspr-bake_5.jpg|400px]] | ||
| + | [[Image:2017-12-20-wspr-bake_6.jpg|400px]] | ||
| + | |||
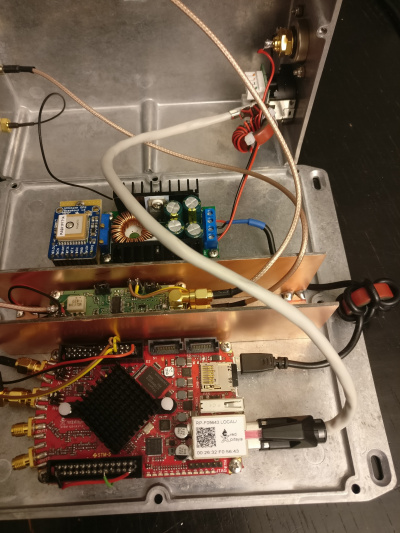
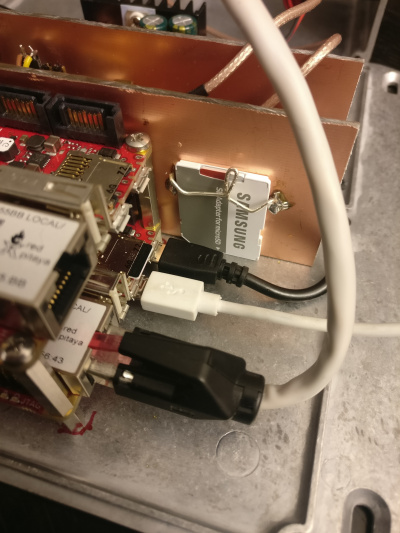
| + | Please note the integrated service equipment (white MicroUSB cable for a serial diagnostic connecton): | ||
| + | |||
| + | [[Image:2017-12-20-wspr-bake_7.jpg|400px]] | ||
| + | [[Image:2017-12-20-wspr-bake_8.jpg|400px]] | ||
| + | |||
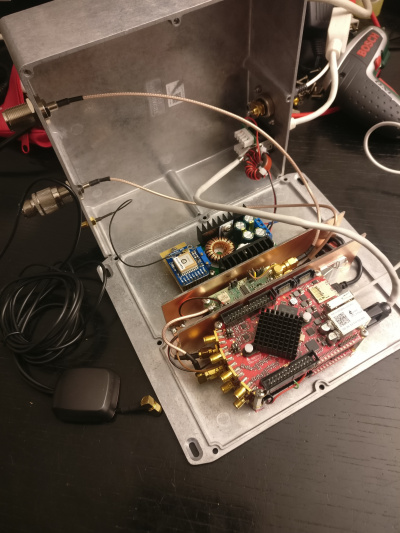
| + | Now with integrated spare parts: | ||
| + | |||
| + | [[Image:2017-12-22-wspr-bake_1.jpg|400px]] | ||
| + | [[Image:2017-12-22-wspr-bake_2.jpg|400px]] | ||
| + | [[Image:2017-12-22-wspr-bake_3.jpg|400px]] | ||
| + | |||
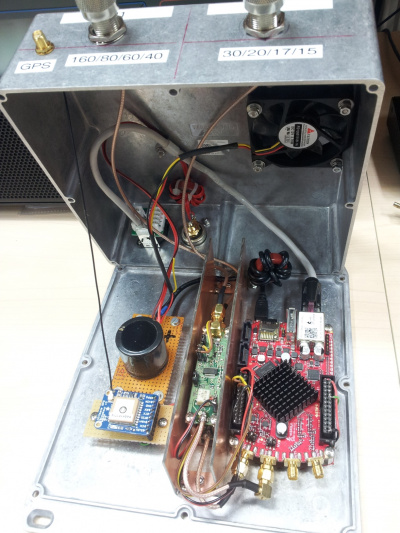
| + | After Rainer DF2NU's modifications concerning power supply and temperature control (fan): | ||
| + | |||
| + | [[Image:2017-12-27-wspr-bake_1.jpg|400px]] | ||
| + | [[Image:2017-12-27-wspr-bake_2.jpg|400px]] | ||
| + | [[Image:2017-12-27-wspr-bake_3.jpg|400px]] | ||
| + | |||
| + | Some more ventilation, made by Rainer DF2NU: | ||
| + | |||
| + | |||
| + | [[Image:2017-12-29-wspr-bake_1.jpg|400px]] | ||
| + | |||
| + | === Phase 2 === | ||
| + | |||
| + | -- no pictures yet -- | ||
Aktuelle Version vom 25. Januar 2018, 12:02 Uhr
Inhaltsverzeichnis
1 Project Scope
We want to deploy a WSPR beacon in Antarctica. There are two phases of the project:
- Deployment of an initial version
- Deployment of a higher integrated version
I have the honor to design the initial version, only with one Red Pitaya. Pictures below.
Here is the link to the Project Main Site:
https://dl0ht.fk4.hs-bremen.de/polarbake/index.html
2 Important Links
- https://learn.adafruit.com/adafruit-ultimate-gps-on-the-raspberry-pi/using-uart-instead-of-usb
- http://www.danmandle.com/blog/getting-gpsd-to-work-with-python/
- http://www.itechlounge.net/2017/10/linux-how-to-add-rc-local-in-debian-9/
- http://www.box73.de/product_info.php?products_id=3737
3 Credits
Thanks to:
- Michael Hartje DK5HH for comprehensive support regarding Pitaya and FPGA code
- Rainer Englert DF2NU for support on construction details
- Christian Reiber DL8MDW for the transmitter (well, this is not so much related to my part, but nevertheless)
- Felix Riess DL5XL for setting it up in Antarctica
4 The Transmitter
Here are the documents of Christian Reiber DL8MDW, who built the WSPR transmitter:
5 Software
5.1 System Config
https://russ.garrett.co.uk/2009/01/01/linux-kernel-tuning/
Modification of the file /etc/sysctl.conf
vm.min_free_kbytes = 32678
This tells the kernel to try and keep 32MB of RAM free at all times. It’s useful in two main cases:
Swap-less machines, where you don’t want incoming network traffic to overwhelm the kernel and force an OOM before it has time to flush any buffers. x86 machines, for the same reason: the x86 architecture only allows DMA transfers below approximately 900MB of RAM. So you can end up with the bizarre situation of an OOM error with tons of RAM free.
vm.swappiness = 0
It’s said that altering swappiness can help you when you’re running under high memory pressure with software that tries to do its own memory management (i.e. MySQL). We’ve had limited success with this and I’d much prefer to use software which doesn’t pretend to know more about your hardware than the OS (i.e. PostgreSQL).
5.2 Network Config
IP-Adresse:       192.168.33.90 bis 192.168.33.95
Netzmaske:        255.255.255.0
Gateway:          192.168.33.254
Nameserver (DNS): 192.168.38.46
Timeserver (NTC): 192.168.33.40
Timezone:         UTC

Call: DP0GVN
GRID: IB59UH
File /etc/resolv.conf:
nameserver 192.168.38.46
File /etc/network/interfaces.d/eth0:
iface eth0 inet static
        address 192.168.33.90
        netmask 255.255.255.0
        gateway 192.168.33.254
File /etc/ntp.conf:
# add a server entry:
server 192.168.33.40

# outcomment the pool entries:
# pool 0.debian.pool.ntp.org iburst
# pool 1.debian.pool.ntp.org iburst
# pool 2.debian.pool.ntp.org iburst
# pool 3.debian.pool.ntp.org iburst
(leave the rest as it is)
5.3 Band Config
cat write-c2-files.cfg
// frequency correction, from -100.0 ppm to +100.0 ppm
corr = 0.93;

// comma separated list of bands
// trailing commas are not allowed
bands = (
//  { freq  =  0.137500; chan = 1; },
//  { freq  =  0.475700; chan = 1; },
  { freq  =  1.838100; chan = 1; },
  { freq  =  3.594100; chan = 1; },
  { freq  =  5.288700; chan = 1; },
  { freq  =  7.040100; chan = 1; },
  { freq  = 10.140200; chan = 2; },
  { freq  = 14.097100; chan = 2; },
  { freq  = 18.106100; chan = 2; },
  { freq  = 21.096100; chan = 2; }
//  { freq  = 24.926100; chan = 1; },
//  { freq  = 28.126100; chan = 1; },
//  { freq  = 50.294500; chan = 1; }
);
5.4 Temperature Control
We found that the CPU is becoming really hot and the board smells like burned electronics :-) Not good.
Accordingly a fan solution was created. Here is an interesting recommendation how to do that:
- https://rroeng.blogspot.de/2014/03/keep-your-red-pitaya-cool.html
- http://redpitaya.readthedocs.io/en/latest/developerGuide/125-14/cooling.html
In order to read out the CPU temperature, I found a little script. Note that it requires the installation of the "bc" package.
root@pitaya1:~# cat get_temp.sh
#!/bin/sh
#
# from http://www.kkn.net/~n6tv/xadc.sh
# updated by Michael Hirsch, Ph.D.
#
# works in Ash (Red Pitaya ecosystem 0.95) and Bash (ecosystem 0.97)

# path to IIO device
XADC_PATH=/sys/bus/iio/devices/iio:device0

# Note: used "cat" to work in Ash instead of the typically recommended Bash "<".

OFF=$(cat $XADC_PATH/in_temp0_offset)
RAW=$(cat $XADC_PATH/in_temp0_raw)
SCL=$(cat $XADC_PATH/in_temp0_scale)

FORMULA="(($OFF+$RAW)*$SCL)/1000.0"
VAL=$(echo "scale=2;${FORMULA}" | bc)
echo "in_temp0 = ${VAL} °C"
5.5 Preamplifier control
The preamplifier we are using is this one:
http://www.box73.de/product_info.php?products_id=3737
Here is the datasheet: Datei:2018-01-20-RedPitaya-Vorverstaerker.pdf
We are using two preaplifiers. Pavel Demin's i2c-write command only allows to address one single preamp. For this reason, we duplicated this code. The original code was renamed into i2c-write-60 since the I2C bus ID of the preamp is 60 and 61. The duplicated code was edited accordingly and the binary was saved into the file i2c-write-61.
root@pitaya1:~# cat i2c-write-61.c
#include <stdio.h>
#include <stdint.h>
#include <stdlib.h>
#include <unistd.h>
#include <errno.h>
#include <fcntl.h>
#include <sys/ioctl.h>

#define I2C_SLAVE       0x0703 /* Use this slave address */
#define I2C_SLAVE_FORCE 0x0706 /* Use this slave address, even if it
                                  is already in use by a driver! */

#define ADDR_DAC0 0x60 /* MCP4725 address 0 */
#define ADDR_DAC1 0x61 /* MCP4725 address 1 */

int main(int argc, char *argv[])
{
  int fd;
  char *end;
  long number;
  uint8_t buffer[2];

  errno = 0;
  number = (argc == 2) ? strtol(argv[1], &end, 10) : -1;
  if(errno != 0 || end == argv[1] || number < 0 || number > 4095)
  {
    printf("Usage: i2c-write [0-4095]\n");
    return EXIT_FAILURE;
  }

  if((fd = open("/dev/i2c-0", O_RDWR)) >= 0)
  {
    if(ioctl(fd, I2C_SLAVE_FORCE, ADDR_DAC1) >= 0)
    {
      buffer[0] = number >> 8;
      buffer[1] = number;
      if(write(fd, buffer, 2) > 0) return EXIT_SUCCESS;
    }
  }

  return EXIT_FAILURE;
}
Compilation is easy:
gcc i2c-write-61.c -o i2c-write-61
5.6 Receiver Initialization
In order to load the FPGA code and in order to initialize the preamplifiers, a start script was created:
 root@pitaya1:~# cat /etc/rc.local
#!/bin/sh -e
cat /root/sdr_transceiver_wspr.bit > /dev/xdevcfg
/root/i2c-write-60 4095
/root/i2c-write-61 4095
exit 0
To ensure that the script is activated on boot, the following file must be created and the service must be enabled. See this link:
http://www.itechlounge.net/2017/10/linux-how-to-add-rc-local-in-debian-9/
root@pitaya1:/# cat /etc/systemd/system/rc-local.service
[Unit]
Description=/etc/rc.local
ConditionPathExists=/etc/rc.local

[Service]
Type=forking
ExecStart=/etc/rc.local start
TimeoutSec=0
StandardOutput=tty
RemainAfterExit=yes
SysVStartPriority=99

[Install]
WantedBy=multi-user.target
And then, make executable:
chmod +x /etc/rc.local
Enable on boot:
systemctl enable rc-local
Invoke the script, make sureyou don't get any errors:
systemctl start rc-local.service
If you hit errors, check it again:
systemctl status rc-local.service
6 Shopping List
6.1 Planned Items
- 2HE 19" Good Quality Metal Case
- http://www.gie-tec.de/downloads/db_133030.pdf
- https://www.conrad.de/de/19-zoll-baugruppentraeger-4365-x-200-stahlblech-schroff-multipacpro-20860-120-1-st-546378.html
- Bodenblech sollte 1-2mm dick sein, wg. Senkkopfschrauben
- https://schroff.pentair.com/de/schroff/zubehoer-baugruppentraeger-gehaeuse
- Schroff 20860-645
- Front Panel Connectors:
- Neutrik RJ45 thru
- 4x Neutrik USB
- SMA -Durchführung mit Pigtail uFL
- 240V Switch
- Mains Line Choke (Netzfilter + Kaltgeräteanschluß)
- Fuse
- 2x Telegärtner 75V N/N thru
- Mikrotik RB450G or similar
- MeanWell RD-125A Dual Coltage Power Supply
- Raspberry Pi V3
- 6x MicroSD 64 GB
- GPS Antenne Active mit SMA Connector
- Adafruit Ultimate GPS Breakout - 66 channel V3
- uFL SMA pigtail
- 2x Stemlab 14Bit RedPitaya
- 4x 30dB Attenuator SMA
- 4x PreAmp for RedPitaya
- 34 StandOff M3
- 6x 64GB USB Stick
- 14 Relais Wechsler bistabil 5V
- 28 Freilaufdioden
6.2 Open Items
- Flachsteckhülsen
- 2,5m² Kabelverbinder
- 19" 2HE Metal Case
- Neutrik RJ45 thru
- 3x Neutrik USB
- SMA -Durchführung mit Pigtail uFL
- 2x Telegärtner 75V N/N thru
- MeanWell RD-125A Dual Coltage Power Supply
- Raspberry Pi V3
- Raspberry Pi V3
- 6x MicroSD 64 GB
- GPS Antenne Active mit SMA Connector
- Adafruit Ultimate GPS Breakout - 66 channel V3
- uFL SMA pigtail
- 2x Stemlab 14Bit RedPitaya
- 4x 30dB Attenuator SMA
- 4x PreAmp for RedPitaya
- 34 StandOff M3
- 6x 64GB USB Stick
- 14 Relais Wechsler bistabil 5V
- 28 Freilaufdioden
6.3 Provided to the project
- Mains line choke 3 €
- Mains switch: 2 €
- Fuse holder: 2 €
- SHT15 incl. headers: 45 €
- 1x Neutrik USB thru: 9 €
- 1x Neutrik RJ45 thru: 9 €
- Mikrotik RB750GL: 55 €
Total: 125 €
6.4 Purchased
- 2x Red Pitaya Stemlab 125-14
- 16x Wechsler bistabil 5V
- 6x MicroSD 64 GB
- MeanWell RD-125A Dual Coltage Power Supply
- Raspberry Pi V3: 42 €
- 2x Überspannungsableiter Telegärtner J01028A0044: 142 €
- Schroff multipacPro 20860-127 2HE 340T: 102,60 €
7 Images
7.1 Phase 1
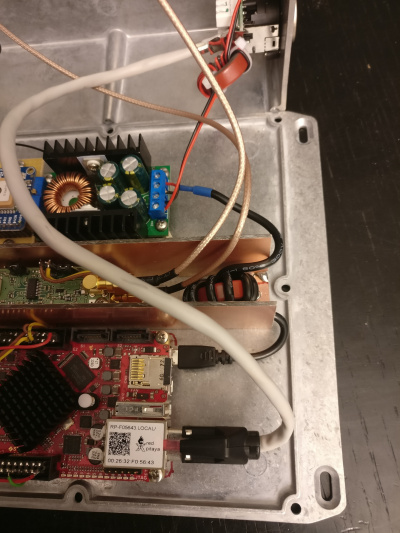
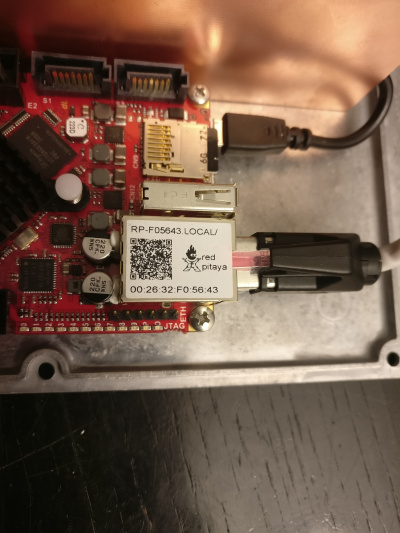
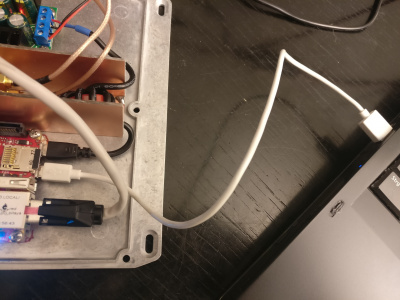
Please note the integrated service equipment (white MicroUSB cable for a serial diagnostic connecton):
Now with integrated spare parts:
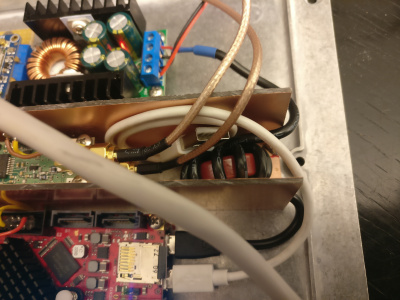
After Rainer DF2NU's modifications concerning power supply and temperature control (fan):
Some more ventilation, made by Rainer DF2NU:
7.2 Phase 2
-- no pictures yet --
