Minimal Arduino: Unterschied zwischen den Versionen
Dl8rds (Diskussion | Beiträge) |
Dl8rds (Diskussion | Beiträge) (→Programming) |
||
| Zeile 35: | Zeile 35: | ||
== Programming == | == Programming == | ||
| + | |||
| + | Oh, well, the program was just a standard program to show that flashing worked fine: | ||
| + | |||
| + | <tt> | ||
| + | /* | ||
| + | Blink | ||
| + | Turns on an LED on for one second, then off for one second, repeatedly. | ||
| + | |||
| + | This example code is in the public domain. | ||
| + | */ | ||
| + | |||
| + | // Pin 13 has an LED connected on most Arduino boards. | ||
| + | // give it a name: | ||
| + | int led = 13; | ||
| + | |||
| + | // the setup routine runs once when you press reset: | ||
| + | void setup() { | ||
| + | // initialize the digital pin as an output. | ||
| + | pinMode(led, OUTPUT); | ||
| + | } | ||
| + | |||
| + | // the loop routine runs over and over again forever: | ||
| + | void loop() { | ||
| + | digitalWrite(led, HIGH); // turn the LED on (HIGH is the voltage level) | ||
| + | delay(1000); // wait for a second | ||
| + | digitalWrite(led, LOW); // turn the LED off by making the voltage LOW | ||
| + | delay(1000); // wait for a second | ||
| + | } | ||
| + | </tt> | ||
== Images == | == Images == | ||
Version vom 7. März 2021, 17:04 Uhr
Inhaltsverzeichnis
1 Scope
This little project goes back to a phone call a couple of years ago, where my phone partner told me that he was interested in programming bare bone Atmel 328 ICs. I thought, well this is kind of interesting, because the Arduino platform is quite nice, but there are times where I wanted to have such a little logic platform alone without the need to have a standard Arduino PCB.
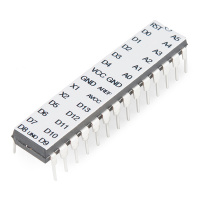
So I got myself a couple of Arduino ICs from Sparkfun.
It took me a long time until I had the opportunity and spare time to try them, but now I did and here are my insights!
2 Components
- SparkFun ATmega328 with Arduino Optiboot (Uno) https://www.sparkfun.com/products/10524
- Note that you can also get this IC from Reichelt: https://www.reichelt.de/arduino-atmega328-mit-arduino-bootloader-ard-atmega-328-p230602.html
- SparkFun 5V FTDI Basic interface: https://www.sparkfun.com/products/9716
- three Tantal capacitors 100nF
- A crystal 16,0000 MHz
- two capacitors 22pF
- A breadboard and a set of bridges
- a 10K resistor and a pushbutton switch
- a 470 Ohm resistor and a red LED
- The Standard Arduino development environment
Some more useful information:
- Here is the datasheet of the Atmel 328P: https://cdn.sparkfun.com/assets/1/1/9/c/b/Atmel-42735-8-bit-AVR-Microcontroller-ATmega328-328P_Datasheet.pdf
- Here is some information on how to hook up the FTDI: https://learn.sparkfun.com/tutorials/sparkfun-usb-to-serial-uart-boards-hookup-guide
3 Setup
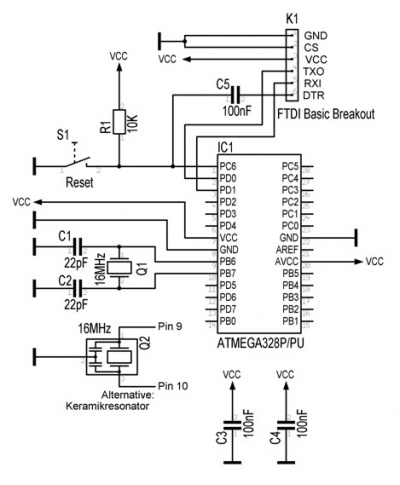
I followed this instruction here: https://www.kriwanek.de/index.php/de/arduino/boards/410-minimal-arduino-f%C3%BCrs-breadboard
I am taking the circuit from Kriwanek's web page:
4 Programming
Oh, well, the program was just a standard program to show that flashing worked fine:
/*
 Blink
 Turns on an LED on for one second, then off for one second, repeatedly.

 This example code is in the public domain.
*/
// Pin 13 has an LED connected on most Arduino boards. // give it a name: int led = 13;
// the setup routine runs once when you press reset: void setup() {
 // initialize the digital pin as an output.
 pinMode(led, OUTPUT);
}
// the loop routine runs over and over again forever: void loop() {
 digitalWrite(led, HIGH);   // turn the LED on (HIGH is the voltage level)
 delay(1000);               // wait for a second
 digitalWrite(led, LOW);    // turn the LED off by making the voltage LOW
 delay(1000);               // wait for a second
}

