Turn a Fonera router into a link station
Inhaltsverzeichnis
1 Research first
RTFM: Read the fucking manuals. Or the available documentation first. There's plenty of information out in the net, and here's a small compilation of links:
- http://wiki.openwrt.org/OpenWrtDocs/Hardware/Fon/Fonera
- http://sodoityourself.com/accessing-serial-console-on-the-fon
- http://jauzsi.hu/2006/10/13/inside-of-the-fonera
- http://www.dd-wrt.com/wiki/index.php/LaFonera_Hardware_Serial-Cable-Port
- http://www.flickr.com/photos/mother/261623405/sizes/o/
- http://www.larsen-b.com/Article/262.html
- http://wiki.cuwin.net/index.php?title=Flashing_the_La_Fonera_with_OpenWRT Excellent intro on flashing the fonera
- http://freethenet.scribblewiki.com/Merhaki Flashing a technically very related hardware
- http://sots.refuzed.org/?p=129&language=de Very cool: Upgrade the fonera by some SD Card storage (German)
- http://metalab.at/wiki/Fonera damn good Fonera hacking site
2 Getting root access to the Fonera
There are many ways to gain access to a router hardware. Some vendors provide a way to flash the router through an upload interface. Other vendors (like ASUS) provide a TFTP flash procedure. Most devices however somewhere have serial pins with which you can directly access a root shell. That's the case with the fonera router.
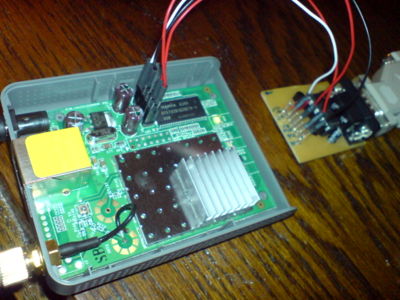
Nevertheless, you can't just connect it to the serial port of your workstation, because the voltage levels are different. You need to adapt the 5 V, or even 12 V from your computer to the 3.3 V on the device and vice versa. The 3.3V level is called TTL. For this reason I have built a level shifter, but you can buy ready kits from a multitude of vendors, also on Ebay.
But be careful you get the right converter chip! There are different versions, one for 5 V, one for 3.3 V. You definitely need the 3.3 V version.
Then start a minicom. Needless to say, forget WINDOWS on your workstation, since Hyperterminal isn't even part of VISTA any more. Hasta la Vista, baby. On linux, the package is called minicom. And you must make sure you configure the serial port correctly. Follow the instructions here:
- http://wiki.openwrt.org/OpenWrtDocs/Hardware/Fon/Fonera
- http://www.dd-wrt.com/wiki/index.php/LaFonera_Hardware_Serial-Cable-Port
Then replug the power cord and you can observe this:
+PHY ID is 0022:5521
Ethernet eth0: MAC address xx:xx:xx:xx:xx:xx
IP: 0.0.0.0/255.255.255.255, Gateway: 0.0.0.0
Default server: 0.0.0.0

RedBoot(tm) bootstrap and debug environment [ROMRAM]
Non-certified release, version v1.3.0 - built 16:57:58, Aug  7 2006

Copyright (C) 2000, 2001, 2002, 2003, 2004 Red Hat, Inc.

Board: ap51
RAM: 0x80000000-0x81000000, [0x80040450-0x80fe1000] available
FLASH: 0xa8000000 - 0xa87f0000, 128 blocks of 0x00010000 bytes each.
== Executing boot script in 1.000 seconds - enter ^C to abort

== Executing boot script in 1.000 seconds - enter ^C to abort

== Executing boot script in 1.000 seconds - enter ^C to abort
^C
RedBoot> ^C
RedBoot> ^C
RedBoot>
The RedBoot is kindof a BIOS and a good point to start flashing.
3 Flashing the Fonera
This site provides a number of ways to flash the fonera. I have copied the instructions from there since they worked fine for me.
Here's how I did it:
- I gained access into RedBoot through a serial console, so one step was done the easy way.
- Install a tftp server on my workstation and make the OpenWRT image available. I have taken the original image files for the first attempt:
- Tell RedBoot where to get the flash image from:
RedBoot> ip_address -l 192.168.1.50/24 -h 192.168.1.123
192.168.1.50 is the workstation with the TFTP server and 192.168.1.123 is the IP you're assigning to RedBoot.
- Initialize the flash partition table. This "frees" the usable flash space, between 0xA8030000 and 0xA87E0000.
RedBoot> fis init
- Load the root file system from the tftp server:
RedBoot> load -r -b 0x80041000 openwrt-atheros-2.6-root.squashfs
As an alternative, you can also choose the http method:
RedBoot> load -r -b 0x80041000 -m http -h 192.168.1.66 /fonera/openwrt-atheros-root.squashfs
- Write the root file system to flash:
fis create -l 0x06F0000 rootfs
- Be patient this will take ~15-20m
- The FON will not respond to ping requests while writing to flash
- Load the kernel from the tftp server:
RedBoot> load -r -b 0x80041000 openwrt-atheros-2.6-vmlinux.lzma
- Write the kernel to flash:
RedBoot> fis create -r 0x80041000 -e 0x80041000 vmlinux.bin.l7
- This can take a couple minutes
- Tell RedBoot which kernel to boot into:
RedBoot> fis load -l vmlinux.bin.l7
- Boot into the new system:
RedBoot> exec
- You may have to power cycle the FON
- Cross your fingers
When OpenWrt first boots, it formats the rest of the free flash space as a jffs2 filesystem. This might take a few minutes, so it's probably a good idea to let that finish before power cycling after the first boot.
If you leave the serial console attached, you can observe the entire process. After booting, you can also access the root shell directly through the serial console. OpenWRT will initially set the IP 192.168.1.1 unless you have configured the OpenWRT image compilation differently - if you have compiled your own image. After booting you should be able to telnet the Fonerat at 192.168.1.1. But watch out! This is an IP which is frequently used by other routers as a default route. If you have your main router still rinning in the same network, there might be a conflict. So better unplug the main router :-)
4 Compile the Flash image by myself
I haven't gone so far yet, but that's one of the next steps.
5 Build a nice little case
All these separate PCBs are just ugly. So I built a nice little and stable case to contain the level shifter and the fonera board.
I have made good experiences with PCBs with copper on one side. They are excellent to solder and they are very stable. Together with a set of screws they can be mounted really professionally.
- Photographs to follow.
6 Install a suitable Antenna
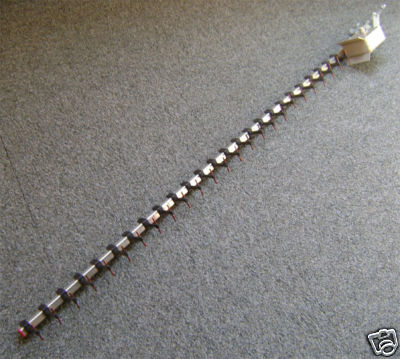
I have purchased a 22 element TONNA Yagi, 1.5 meters long. It has an excellent gain of 18,1 dBi. The antenna will be set up at DB0MHB. I will operate just a very small YAGI.
7 Provide some storage
And to complete all this madness, there are nice plans around in the net how to upgrade your Fonera into a little kind of a server. Therefore you need storage, and yes, there are unused GPIO pins on the Fonera board. Here's a collection of links that provide the necessary knowledge.
- http://wiki.openwrt.org/OpenWrtDocs/Customizing/Hardware/MMC - general GPIO / MMC information
- http://fghhgh.150m.com/ - a driver for GPIO
- http://www.fonboard.de/viewtopic.php?f=7&t=1945 - an extensive discussion with lots of info
- http://www.dd-wrt.com/wiki/index.php/Fonera_SD-Card_hack - great info, here for DD-WRT
I haven't started this yet, because I don't have all the components yet. But I'll keep you up to date.
8 Future experiments
8.1 Forward the serial port over the LAN
ser2net seems an interesting way to go.

