A SVXLink Server based on the BeagleBoard: Unterschied zwischen den Versionen
Dl8rds (Diskussion | Beiträge) (→Links) |
Dl8rds (Diskussion | Beiträge) |
||
| Zeile 46: | Zeile 46: | ||
* http://elinux.org/BeagleBoardUbuntuNetwork | * http://elinux.org/BeagleBoardUbuntuNetwork | ||
* http://elinux.org/BeagleBoardRawLCD | * http://elinux.org/BeagleBoardRawLCD | ||
| + | |||
| + | Transceiver interface | ||
| + | * http://www.darc.de/distrikte/g/38/soundkarteninterface.htm | ||
== Software == | == Software == | ||
Version vom 26. August 2009, 02:13 Uhr
Inhaltsverzeichnis
1 Project History
Ever since I have been interested in ever smaller and more efficient hardware solutions that nevertheless fulfill their assigned tasks just perfectly while consuming as little as possible power. I started off with other platforms: The
- The Cisco Linksys WRTSL54GS was a nice start. I killed the serial port with my soldering iron.
- The ASUS WL-500GP was more comfortable since it had two USB2.0 ports.
- The Fonera Router was also an interesting platform - cheap and powerful enough for connection issues.
- An Intel Atom CPU Embedded Board was the hardware basis for the first Echolink server I built. But for my taste it still consumes too much power while being oversized for such a task: A Low-Power Combined Echolink and ATV Server
So my attention was won by the BeagleBoard. It is a neat little ARM based board which provides more comfort than the Linksys / ASUS / Fonera class of devices but is smaller and far more power efficient than the Intel Atom. The first test showed that it relly just consumes 1.83 Watts, the current I measured was down at 0,366 A @ 5 V. So that's very promising.
It is striking that the BeagleBoard does not have an Ethernet device. So you cannot connect it to the network and start off, but there's more that needs to be done. Luckily enough, it has some more interfaces that can be used for networked I/O like the USB 2.0 port, which should be sufficiently expandable and also fast enough.
2 Project Goals
The goal of this project is to build a highly integrated and energy efficient Echolink Link node, which has a small transceiver built in. The main focus is on power efficiency, with total power consumption not exceeding 3 watts (250 mA @ 12V), including the transmitter.
3 Hardware
3.1 BeagleBoard
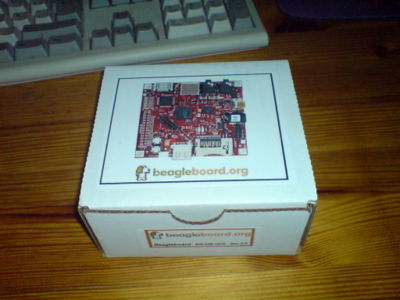
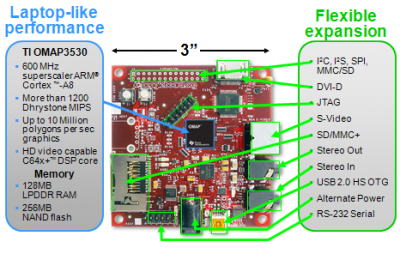
The core is the BeagleBoard:
IMG SRC: beagleboard.org (Lizenz CC-BY-SA)
- OMAP3530 processor delivers laptop-like performance at handheld power levels
- Over 1,200 Dhrystone MIPS using the superscalar ARM Cortex-A8 with highly accurate branch prediction and 256KB L2 cache running at up to 600MHz
- OpenGL© ES 2.0 capable 2D/3D graphics accelerator capable of rendering 10 million polygons per second
- HD video capable TMS320C64x+™ DSP for versatile signal processing at up to 430MHz
- USB power
3.2 Transmitter: Standard C-408
- 0.2 Watts
3.3 Transceiver Interface
- still open issue
4 Links
BeagleBoard Reference, which will answer all your questions on the hardware: http://beagleboard.org/static/BBSRM_latest.pdf
- http://beagleboard.org
- http://code.google.com/p/beagleboard/
- http://elinux.org/BeagleBoardUbuntu
- http://elinux.org/BeagleBoard/contest#BeagleHam
- https://wiki.ubuntu.com/ARM/RootfsFromScratch
- http://code.google.com/p/beagleboard/wiki/LinuxHints supergreat hints, esp. on switching the graphics output
- http://beagleboard.org/project/Ethernet+expansion+board/ supercool expansion board. Will have it as soon as it is out.
- http://elinux.org/BeagleBoardUbuntuNetwork
- http://elinux.org/BeagleBoardRawLCD
Transceiver interface
5 Software
5.1 Operating System
Firstly I want to point out that I am not using the Angstrom firmware but Ubuntu, since I am running Ubuntu on all my systems.
The installation procedure is basically this:
- Generate a rootstock Karmel firmware image on the local Linux (intel) machine.
- Copy it over to a SD card and boot the beagleboard
- log in and enjoy
Here it is in more detail:
We assume you have Ubuntu Linux. Other Linux variants will also work, but you must figure out yourself how to fix occasional problems.
5.1.1 The images
First, install qemu and the most recent debootstrap as well as the rootstock script:
apt-get install qemu
wget http://ports.ubuntu.com/pool/main/d/debootstrap/debootstrap_1.0.13~jaunty1_all.deb
sudo dpkg -i debootstrap_1.0.13~jaunty1_all.deb
wget http://www.rcn-ee.com/deb/tools/rootstock
sudo chmod u+x rootstock
Then compile the firmware image:
./rootstock --fqdn beagleboard --login ubuntu --password temppwd --imagesize 6G --seed linux-firmware,wireless-tools --dist karmic
--serial ttyS2 --kernel-image --kernel-image http://rcn-ee.com/deb/kernel/beagle/karmic/v2.6.29-58cf2f1-oer40.5/linux-image-2.6.29-oer40.5_1.0karmic_armel.deb
As you see, I am using the 2.6.29 karmic kernel. Upon Completion, you should have:
armel-rootfs-<date>.tgz
vmlinuz-2.6.<version>
5.1.2 The Storage Medium
Now it's time to prepare the storage medium. Starting with an empty SD card and using gparted, you can create:
- 50 MiB Primary Partition, fat32
- Rest as ext2/ext3
Gparted Example: http://nishanthmenon.blogspot.com/2008/08/how-to-boot-beagle.html
If you want, you can also do that by hand using fdisk.
Anyway, on my machine, the partitions appear as:
/dev/mmcblk0p1 mounted to /media/LABEL
/dev/mmcblk0p2 mounted to /media/disk
5.1.3 Getting the images on the storage medium
The command
sudo apt-get install uboot-mkimage
didn't work for me since uboot does not seem to exist for Ubuntu Hardy as of yet. I just took the deb package of Ubuntu Intrepid, given that this is just a very small program with just 9 kB. Anyway, I could install it:
wget http://lug.mtu.edu/ubuntu/pool/universe/u/uboot-mkimage/uboot-mkimage_0.4_i386.deb
dpkg -i uboot-mkimage_0.4_i386.deb
then I started the preparation. If you have another kernel version, be sure to indicate the correct file name.
$> mkimage -A arm -O linux -T kernel -C none -a 0x80008000 -e 0x80008000 -n "Linux" -d ./vmlinuz-2.6.29-oer40.5  ./uImage
Image Name:   Linux
Created:      Sat Aug 22 22:31:44 2009
Image Type:   ARM Linux Kernel Image (uncompressed)
Data Size:    3021896 Bytes = 2951.07 kB = 2.88 MB
Load Address: 0x80008000
Entry Point:  0x80008000
The result is a file called 'uImage'.
Then I simply copied the file uImage to /media/LABEL (which is the FAT32 disk) and used tar to extract the contents of the root filesystem to the ext3 partition.
tar xfp /home/markus/armel-rootfs-200908222018.tgz -C /media/disk
To support networking right away (given that you connect an ethernet-capable device - may also be ethernet over USB), add the following stanza to /etc/network/interfaces
auto eth0
iface eth0 inet dhcp
5.1.4 Beagleboard: Setup U-boot for boot
Using a terminal program, stop u-boot and add these commands:
For Linux Kernel 2.6.29 and higher using DSS2
setenv bootcmd 'mmcinit; fatload mmc 0:1 0x80300000 uImage; bootm 0x80300000'
or
setenv bootcmd 'mmc init; fatload mmc 0:1 0x80300000 uImage; bootm 0x80300000' (r27)

setenv bootargs 'console=ttyS2,115200n8 console=tty0 root=/dev/mmcblk0p2 rootwait rootfstype=ext3 ro omapfb.mode=dvi:1280x720MR-16@60'
saveenv
boot
You may adapt the resolution to your screen as following :
omapfb.mode=dvi:1280x720MR-16@60
Modes:
"1024x768MR-16@60""800x600MR-16@60" ...
Here is more explanation on dss video options : http://git.kernel.org/?p=linux/kernel/git/tmlind/linux-omap-2.6.git;a=blob;f=Documentation/fb/modedb.txt;h=ec4dee75a35450376ad13442ea926eaf76de76aa;hb=HEAD
Now proceed along the instructions given here: http://elinux.org/BeagleBoardUbuntu#Beagleboard:_First_boot
5.2 SVXLink
In order to compile for the ARM CPU, you can either crosscompile which is somewhat difficult or install the BeagleBoard first and log on and compile it there.

